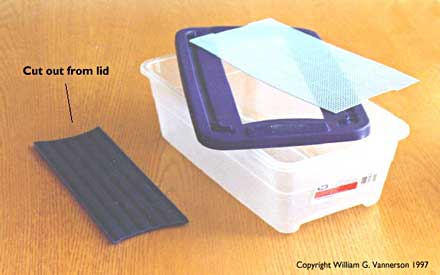
Shoe Box Tank Parts Ready for Assembly
Shoe Box Tanks & Film Can Filters
by Bill Vannerson
Sometimes it's the little things that experienced killie keepers do without a second thought that can slow down an inexperienced hobbyist. For example, a seasoned veteran could probably throw together a bunch of spawning mops without thinking twice about it. A rookie, such as myself, has to work through each and every step for the first time. What type and color yarn, how big of a cork, where can I find corks, etc. No, it's not rocket science but it is a process that everyone has to step through a first time. This article will describe the process I went through to construct small killie tanks from plastic shoe boxes and canister filters from discarded plastic 35mm film canisters so that other newbies can see how easy it is and do it themselves.
My inspiration comes from George Fryk, a ChiKA member who spoke at the July 1997 Chicago Killifish Association meeting about using kitchen utensils and other gadgets and knickknacks in the Fishroom. Tupperware for transporting fish, kitchen blender to pulverize peat, a metal sieve to strain eggs from the peat a fishroom blower from a junkyard auto air compressor and assorted syringes and gadgets from American Science and Supply (773/763-0313) As a relative newcomer, a few of these tips were real eye openers. I have read about the use of shoe boxes for killies, but to see George's example with its mesh lid and the little filter he makes for them really hit home.
SHOE BOX TANKS
Many Killie keepers use plastic shoe boxes to house, breed and raise killies. I have seen them before at a friend's house. He simply drilled some holes in the lid to allow air into the box. There was also a slightly larger hole for an airline leading to a sponge filter. George makes his a little bit different. His have a plastic mesh from a craft store that lets in air and light into these little tanks. This lets in more light, which is important in keeping Java Moss or any other plants in the tanks alive.
Shoe Box Tank Parts Ready for Assembly
Tools Required
– Razor knife
– Scissors
– Straight edge
– Hot Glue Gun
Steps
1. Cut a square hole in the lid.
Use the straight edge and the razor knife to create the opening. Leave enough of a flat edge so there's room for gluing the mesh down.
2. Trim the plastic craft mesh to size
Use the scissors to cut a square from the plastic mesh that's slightly bigger than the hole in the lid.
3. Hot glue the mesh to the lid.
Run a bead of hot glue around the edge of the hole and quickly place the mesh on top. Check with the craft store for alternative glues if you don't have or want to buy a glue gun.
4. Cut a small hole in the mesh for an air line at one end.
Use the razor knife to cut away a bit of the plastic mesh at one end (turn four squares into one larger one).
FILM CAN FILTERS
One drawback to using small containers, such as shoe boxes, is that the water can foul quickly. Many killie keepers address this by placing a sponge filter in the box as a site for the beneficial bacterial that are responsible for the nitrogen cycle. Sponge filters a relatively inexpensive at $3 -$4 apiece but George solves the problem a different way that costs just pennies. He uses discarded 35mm film canisters and converts them into miniature filters.
Tools Needed
– Drill or Dremel Tool
– 3/8” Drill Bit
– 3/16” Drill Bit
– 3/32” Drill Bit
– Razor Knife
– Lighter
– Ruler
– Twist Drill (Optional)
– Razor Saw & Miter Box (Optional)
– Safety Glasses
– Gloves
Steps
First of all, please observe safety precautions while working with tools. Wear safety glasses whenever using a power tool and wear gloves to protect your hands whenever you are working with small piece. I didn't and I ended up with a cut on my finger from a drill bit.
There are only five basic step to making the filters. If you plan on making more than one, I recommend that you repeat each step on all materials before proceeding to the next step. This will reduce the amount of time you spend on changing tools like the drill bits..
1. Find Film Canisters
There are two ways you can find suitable film cans. You can buy new rolls of film or you can ask for some from a film developer or drug store film counter. Purchase Fuji film if you opt for the first choice. The reason for Fuji is that it's the only one George has found that has parallel sided where the diameter of the top is the same as the diameter of the bottom. All others taper in slightly from top to bottom. Parallel sides are important because the top must fit after you trim the height of the can down to fit inside of a short shoe box tank. If you plan on using the filter in a taller tank, then you can use any brand and skip ahead to step 2.
The second choice is to stop by a film counter and ask if you can have a few. George warned that the person behind the counter might look at you funny and even object. I tried this method and discovered that he was absolutely correct! It took me a few minutes to explain why I wanted them and when she finally understood she said that she had to check with the manager. It appears that they collect them and sell them for recycling and they were suspicious that I was trying to rip them off or something. Once her manager approved, she became quite friendly and helped me sift through the bag to find ones with parallel sides. This is a challenge as they are not labeled with any brand name.
2. Trim Canister
Now trim them down the top about 1&Mac218;2 to 3&Mac218;4 inches so the filter is not too tall for the shoe box. If your tank or container is tall enough for the entire canister, then skip this step. I used a razor knife and made the cut free hand. The resulting edge was a little wavy but I evened it up enough so that the top fit nice and snug. The cut can be made perfectly even if you have a craft razor saw with a small miter box.
3. Drill Top
Next there are two set of holes that must be drilled into the top. First drill 3/8” hole in center for the lift tube. Then drill a ring of 3/32” or smaller holes for water intake. Be careful when drilling the larger hole as the top tends to spin. I tacked it down to a scrap piece of wood using two small wire brads. I placed the brads where an intake hole would go so I could drill the small holes out. I find it useful to drill a smaller diameter pilot hole in the center before I use the 3/8' drill bit. The water intake holes are easier to drill. The number and location of these holes is not critical.
4. Make lift tube
Construct the lift tube from 3/8” rigid tubing and 3/16” rigid tubing. I used a razor knife to cut the tubing to size. Again, a razor saw and miter box would be a god alternative. The smaller diameter tube cuts easily with the knife. The larger diameter tube is harder. I used the knife to score a small grove all the way around the tube, then grasp both ends and snap the piece off. I made the large tube 3 1&Mac218;2 inches long and the smaller tube 4 inches long.
The twist drill was very useful here to make a tiny pilot hole in the side of the 3/8” tube. Otherwise the 3/16” drill bit will dance all over the place. I also found it useful to place the tube in the corner of a jig I made out of scrap wood.
Drill a 3/16” hole in one side about 1&Mac218;4” inch down from one edge. This hole is for the air supply tube. The tricky part about this hole is that it needs to be at a slant to allow the air supply tube to enter the lift tube at a downward angle. Start by drilling a small pilot hole. I used a hand twist drill but a small drill bit should work too. Next drill with the 3/16 inch bit. Be careful as the work piece tends to jump around. Plus you only want to drill through one side. Finally, slowly tilt the drill bit down to create an oval opening. Again, use caution at this time as the drill bit will grab at the work piece.
Now it's time to insert the air supply tube into the lift tube. First, insert the air supply tube into the entrance hole you just drilled to make sure it slides in smoothly. Remove any burrs or enlarge the hole slightly until it slides in easily. Now use the lighter to warm up the plastic where the first bend will be (see the diagram below). Don't over heat it or it will melt or burn. When it's pliable, insert it into the lift tube and push o that it bends downward inside. The inside tip tends to fold back away from the outside edge. Use a small screw driver or loose drill bit to bend it back. Hold it in place until it cools down and hardens. Finally, warm the spot were the second bend will be and fold it up against the outside of the lift tube.
5. Assemble
This is the easy part! Insert the lift tube assembly into the 3/8” hole in the lid and push down until it nears the bottom of the canister. You do not want it to go all the way down because no water could flow into it. Put some washers or gravel in the bottom of the canister to weigh it down. I use gravel from an established tank so it will “seed” the new filter with bacteria. Wrap filter floss or polyfill batting (I used some scraps from my wife's craft supplies) around the bottom of the lift tube. This is where the nitrifying bacteria will colonize. Insert it into the canister and snap the lid on tight. Use a rubber band to hold the lid down if it doesn't want to stay attached.
Materials List
The total cost to build four tanks and filters was $10.22. That comes to $2.56 each. The actual cost is lower than that because I still have most of the rigid tubing left, and that was the most expensive material. So my actual cost is most likely closer to $2.00 per setup. You can't beat that price!