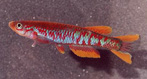
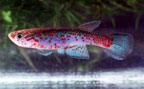
A. mimbon LEC 93/19. Photo by J. Metzger
Killifish Photography
by John Metzger
When I first thought about taking pictures of my fish there was a big debate on KillieTalk about which type of camera was better for our hobby. Everyone who knew anything about taking fish pictures agreed that the 35mm offered a much better quality picture than the digitals, unless you got a $4000 to $5000 digital camera. Needless to say I decided on a 35mm. A few years from now the digitals will probably be a lot cheaper.
Everything I know about fish photography I've learned in the last three months. I bought the AKA video on fish photography by Karl Doering (If you want to see it let me know) and I talked to Karl at the Michiana show and have been e-mailing him several times since. Also found a lot on the web about macro photography and am still learning.
The camera I use is a Minolta X-700. Its a 35mm SLR manual focus camera I got used on e-bay ($225). It came with 3 lenses, a flash and a camera bag. "SLR" stands for "single lens reflex". When you look through the viewfinder, you actually look through some prisms and mirrors, and you wind up looking through the lens. When you trip the shutter, the mirror flips out of the way, and the scene that is projected on the film is exactly what you saw through the viewfinder. If you put on a different lens, you automatically see a different scene through the viewfinder.
The reason you use an SLR camera is because what you see in the view finder is what ends up on the film. Not like the point and shoot cameras where the fish looks big in your view finder when you shot but when you get the pictures back the fish is so small you can hardly see it. The problem is the normal lenses won't focus up close. There are three ways to get close-ups with SLR cameras. The first is with diopters. These are basically a magnifying glass that screws on to any lens. The problem with diopters is they distort the picture on the outside edges. Diopters usually come it a set of three with different magnifications. You can get a set of diopters for $35 to $40. The second way is to use a macro lens. These lenses are made to focus up close. But they are the most expensive option. They range from $120 for a used manual focus lens to over $600 for an auto focus. The third way is to use lens. extensions. This is what I used. I got a set of extensions on e-bay for $24. All they really are is a hollow tube that goes between the camera body and the lens. By moving the lens away from the body you can focus in closer. The set I have has three sizes 12mm, 20mm and 36mm . These extensions can also be connected together to make larger extensions. I use a 50mm lens with a 20mm extension for the most of the pictures I take. For smaller fish I added the smaller extension to get the fish big enough to fill the frame.
The next thing you have to do is move the flash off the camera. To do this you need a extension cord that fits into the hotshoe on the camera and then hooks to the flash. Then you can mount the flash on a tripod. I ended up buying a new flash and extension cord($100). But the new one works with the camera’s TTL flash feature. (TTL stands for “through the lens”). What's nice about this is that there is a sensor in the camera body near the film that will shut the flash off when it has enough light for a proper exposure. This saves a lot of test shots to get the exposure right. You want the flash above and off to the side. Pointed down at a 45 degree angle or you will get a glare off the glass. But now the flash will cause a shadow. To prevent this you need a fill flash or something to reflect light back to the subject. I tried to use a white styro lid to reflect light back. I need to play with this more and may end up getting a fill flash.
A. mimbon LEC 93/19. Photo by J. Metzger
I placed the subjects in an acrylic photo tank I got from Al Anderson. If I had tried to take the pictures in their tanks, I don't think I could get them in focus without a macro lens. Plus the more room they have the less chance of them holding still long enough to get a good shot! In some of my images you can see scratches across the upper left of the pictures. These are scratches in the acrylic that I couldn't even see until the images came back and I looked closely at the acrylic with a strong flashlight. Its amazing what shows up on film. Even little particles floating in the tank. I'm going to make a new photo tank out of glass. Hopefully the glass won't scratch as easily.
Once everything is set up you'll need enough light in the tank to see the fish to focus. I hung a 15 watt fluorescent light about a foot above the tank. Now you’re ready to start shooting. You need to set the camera in manual mode and set the shutter speed. Initially you will need to try different apertures to see what works best.The first roll of film I developed I had 4''x6'' prints made and scanned them on my scanner to get digital images. The fish pictured in this article is from that first roll. When developing the next few rolls I requested 4"x6" prints and also had them put on the Internet. It was only $1 more than ordering just the prints. The high resolution images were available on the internet in 48 hrs. For a 24exp. roll, the cost for developing, prints, and having them put on the internet, was $4.93.