by George Fryk
Reprinted with permission of the Chicago Killifish Association.
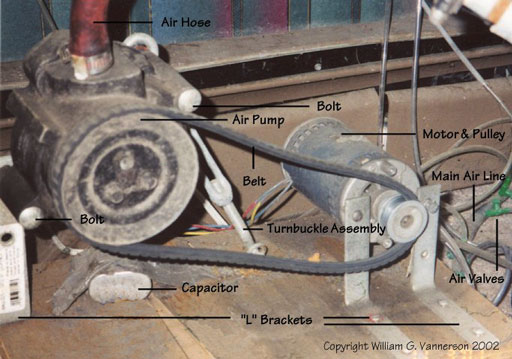
Do It Yourself Air Pump
by George Fryk
Reprinted with permission of the Chicago Killifish Association.
Air Pump Parts List
3 2"x5/8" Corner Irons
2 3"x3/4" Corner Irons (Stanley brand only)
1 3/8"x10&1/2" turnbuckle
1 3/8x16 Nut
1 Fan Belt (Trak auto #30513)
1 4 1/2"x1/2" Pulley (no bigger than 4.5" diameter or the pump will not generate enough air flow.)
1 3/8"x1/2"x1" Oilite Bearing (Berry Bearing #CBO608-08)
4 8-32Xl" Round Head Machine Screws
1 6-32X1" Round Head Machine Screw
1 6' Extension cord
3 Female electrical connectors
1 Electrical Motor (American Science Center #22718)
1 4 MFD Capacitor (American Science Center #22714)
1 Chrysler Air Pollution Pump (From Junk yard, not rebuilt)
1 5" Plumbers' tape
12 1x8 Flat Head Wood Screws
1 l"x8"xl6" Pine Board
4 l"x2" Foam Rubber Pads
The Start
Start with a 1"x8"x16" pine board. This is where the fun begins - sand the board smooth and give it two coats of varnish or your favorite color paint.
Motor Mounts
Take two 2" angle brackets and open the lower hole on both to 3/8". Now cut off the excess metal above the hole and round off the bracket. Set aside for now. Place one 3" angle bracket at the back edge of the board, approximately 1" in from the right side. Take 2 8-32x3/4 round head machine screws, place them through the holes in the bracket and into the studs on the electric motor. Do the same with the second bracket. By the way, you want all the brackets to tuck in under their respective parts (in this case, the motor). The remaining 2" angle bracket is where the artwork comes in. The bracket must be fitted to the back of the motor. Place the bracket against the end plate and mark the location of the screw. Drill a clearance hole for this screw and remove all excess metal from the bracket. Remove the screw from the motor, being careful not to lose the metal clip from inside the motor! Take one 6-32x3/4" machine screw, place it through the bracket and end cap, and screw it into the metal clip. (I told you to be careful with the dumb clip!) You have just completed the motor mounts with all brackets tucked under the motor. Place it 1/2" in from the right side and at the back edge of the base. Now mark and install with the wood screws. Next, install the sleeve and pulley on the motor shaft. Do not tighten the set screw yet!
Air Pump
Now for the air pump. Run a 3/8" bolt through the swivel hole on your nicely polished air pump. (I hope you cleaned it with a wire brush. Solvents or water will freeze the pump permanently.) Place the two brackets with the 3/8"holes on either side of the bolt. Again, both brackets are tucked under the unit. Now place one end of the turnbuckle to the adjusting bolt hole, and install the bolt you salvaged when you removed the pump from the car. Loosen both screws from the front motor mount and place the turnbuckle on the top stud of the motor.
Are we done yet? Not quite.
Place the pump mounts at the front edge of the base and about 3" in from the right side. Place a straight edge against both pulleys and make sure they are parallel. Be sure or you will either burn out the motor or throw off the fan belt. Install four wood screws to pump mounts. Tighten pulley set screw on the motor then tighten the turnbuckle.
Wow! Only Two Items Left!
Place a wood screw in each end of plumbers' tape and fold the tape over the capacitor. Bend the ends down along the sides of the capacitor and secure it between the motor and the pump. Crimp a female terminator on the red and blue wires from the motor. Slide the red wire on the top, rear terminal of the capacitor. The blue wire goes on the top, front terminal. Cut off the receptacle end of your extension cord and discard it. Split the two wires and remove 1/4" of insulation from each. Crimp on your last female terminal to one wire and slide it on the bottom, front terminal. Connect the remaining wire from the motor and the extension cord together. Wrap this connection with electrician’s tape.
Now For the Moment of Truth...Turn it on.
If you feel air coming out of the pump, "congratulations!" If not, don't despair. Move the extension cord wire from the blue to the red terminal side and everything will be okay. Now tape over the connections at the capacitor and secure all wires with electrician’s tape.
Connect the Pipes
Take a piece of rubber tubing you salvaged, and slide it onto the pump. Secure it with one of your salvaged hose clamps. Now you can install a piece of PVC pipe in the other end of the hose and secure it with another of those hose clamps. Finally, hook p your air valves and air lines and you are done.
P.S., the higher you install the unit in your fishroom, the warmer your fish tanks. The lower, the cooler they are.
P.P.S., if you want even less noise, cement the four foam pads to the bottom corners of the board. Have fun!